 基于toml配置文件格式部署frps内网穿透,之前写过一篇[NAS之搭建frp内网穿透服务过程记录](https://www.seesharper.cn/archives/nat.html),当时版本基于`0.4x`,新版本弃用了`.ini`配置文件,改为`TOML`、`YAML `和 `JSON`,`TOML`格式比较精简,同是也是新版本的默认配置文件格式。所以使用`TOML`格式重新部署了之前的项目。在这里记录一下部署过程。 ## 快速启动 1. 通过[releases](https://github.com/fatedier/frp/releases)页面下载适合自己系统的包,以`linux_amd64`平台为例: ```shell wget https://github.com/fatedier/frp/releases/download/v0.52.3/frp_0.52.3_linux_amd64.tar.gz ``` 2. 解压压缩包 ```shell tar zxvf frp_0.52.3_linux_amd64.tar.gz ``` 3. 解压压缩包 ```shell cd zxvf frp_0.52.3_linux_amd64.tar.gz #启动frpc ./frpc -c ./frpc.toml #启动frps ./frps -c ./frps.toml ``` 4. (可选)使用`pm2`守护进程 ```shell cd zxvf frp_0.52.3_linux_amd64.tar.gz #启动frpc pm2 start "./frpc -c ./frpc.toml" -n frpc #启动frps pm2 start "./frps -c ./frps.toml" -n frps #保存任务列表 pm2 save ``` ## 配置文件 配置文件内容上大体和原来差不多,只是写法略有不同,同时命名规则也略有不同,各配置属性名采用了[小驼峰命名法](https://www.baidu.com/s?wd=%E5%B0%8F%E9%A9%BC%E5%B3%B0%E5%91%BD%E5%90%8D%E6%B3%95)。 ### frpc.toml ```toml # 远程服务器地址,支持域名和ip serverAddr = "100.100.100.100" # 远程服务器监听端口,可以配合nginx反向代理实现去端口 serverPort = 37257 # 启用quic协议 transport.protocol = "quic" # 认证token,frpc/frps通信认证 auth.token = "abcdefg" # 启用端口复用 transport.tls.disableCustomTLSFirstByte = false # 客户端面板 webServer.addr = "127.0.0.1" webServer.port = 47400 webServer.user = "adminsweb" webServer.password = "adminsweb" # 日志输出文件路径 log.to = "frpc.log" # 日志文件最多保留天数 log.maxDays = 7 # 相对完整的代理示例,一般情况下http代理只需要填写到 customDomains 即可 # [[proxies]] # name = "web" # type = "http" # localPort = 80 # customDomains = ["www.yourdomain.com"] # # 代理负载均衡,相同groupKey的代理,会视为负载均衡 # # 对于 tcp 类型代理,需要确保 groupKey 相同以进行权限验证,同时 remotePort 也需一致。 # # 对于 http 类型代理,需要保证 groupKey, customDomains(自定义域名),subdomain 和 locations 相同。 # loadBalancer.group = "web" # loadBalancer.groupKey = "123" # # 启用健康检查,类型为 http # healthCheck.type = "http" # # 健康检查发送 http 请求的 path,后端服务需要返回 2xx 的 http 状态码 # healthCheck.path = "/status" # # 建立连接超时时间为 3 秒 # healthCheck.timeoutSeconds = 3 # # 连续 3 次检查失败,此 proxy 会被摘除 # healthCheck.maxFailed = 3 # # 每隔 10 秒进行一次健康检查 # healthCheck.intervalSeconds = 10 # # 获取用户真实IP,具体配置见 https://gofrp.org/zh-cn/docs/features/common/realip/ # transport.proxyProtocolVersion = "v2" # # 带宽限速,支持MB,KB # transport.bandwidthLimit = "1MB" [[proxies]] name = "wiznote" type = "http" localPort = 29981 customDomains = ["wiz.bac.com"] [[proxies]] name = "mysql8" type = "tcp" localPort = 23306 remotePort = 23636 customDomains = ["mysql8.bac.com"] ``` ### frps.toml ```toml # 远程服务器监听端口,可以配合nginx反向代理实现去端口 bindPort = 37257 vhostHTTPPort = 37257 vhostHTTPSPort = 37257 # QUIC 绑定的是 UDP 端口,可以和 bindPort 一样 quicBindPort = 37257 # 认证token,frpc/frps通信认证 auth.token = "abcdefg" # 启用端口复用 transport.tls.disableCustomTLSFirstByte = false # 日志输出文件路径 log.to = "console" # 日志文件最多保留天数 log.maxDays = 7 # 服务端面板 webServer.addr = "0.0.0.0" webServer.port = 47030 webServer.user = "Your User" webServer.password = "Your Password" #webServer.tls.certFile = "Your server.crt" #webServer.tls.keyFile = "Your server.key" ``` 简单应用场景下,以上配置文件已经足够,比如微信支付调试之类的场景,可以在`frpc.tmol`部署一个如下的代理: ```toml [[proxies]] name = "wechatdebug" type = "http" localPort = 23306 customDomains = ["wechatdebug.bac.com"] ``` 此时便可以通过 `http://wechatdebug.bac.com:37257`访问内网的项目,其中`37257` 是`frps.toml`中的`bindPort`,也就是监听端口。 ### 注意: 如果通过上述`frps`配置文件进行配置,首先要确保云服务器和服务器自身的防火墙都开放了对应端口,以上述配置文件为例,需要开放`37257`的`TCP`协议和`UDP`协议端口。以及用于面板访问的`47030`的`TCP`协议端口(不开只是无法访问面板,不影响`frpc`连接)。否则在`frpc`端无法正常连接。同时所使用的自定义域名也要解析到`frps`所在的公网服务器。可以考虑解析`*`记录到服务器,代表所有二级域名。 ## 通过Nginx反代去除端口号 默认情况下,部署完成后,通过自定义域名访问,后面需要带上frps的端口号,这样既不方便,也不美观。可以通过Nginx反向代理来处理。配置如下: ``` #PROXY-START/ location / { proxy_pass http://0.0.0.0:37257; proxy_set_header Host $host; proxy_set_header X-Real-IP $remote_addr; proxy_set_header X-Forwarded-For $proxy_add_x_forwarded_for; proxy_set_header REMOTE-HOST $remote_addr; proxy_set_header Upgrade $http_upgrade; proxy_set_header Connection $connection_upgrade; proxy_set_header x-wiz-real-ip $remote_addr; proxy_set_header X-Forwarded-Proto $scheme; add_header X-Cache $upstream_cache_status; # Set Nginx Cache set $static_fileXI4P7fDl 0; if ($uri ~* "\.(gif|png|jpg|css|js|woff|woff2)$") { set $static_fileXI4P7fDl 1; expires 1m; } if ($static_fileXI4P7fDl = 0) { add_header Cache-Control no-cache; } } location /https { proxy_pass https://0.0.0.0:37257; proxy_set_header Host $host; proxy_set_header X-Real-IP $remote_addr; proxy_set_header X-Forwarded-For $proxy_add_x_forwarded_for; proxy_set_header REMOTE-HOST $remote_addr; proxy_set_header Upgrade $http_upgrade; proxy_set_header Connection $connection_upgrade; proxy_set_header x-wiz-real-ip $remote_addr; proxy_set_header X-Forwarded-Proto $scheme; add_header X-Cache $upstream_cache_status; # Set Nginx Cache set $static_fileXI4P7fDl 0; if ($uri ~* "\.(gif|png|jpg|css|js|woff|woff2)$") { set $static_fileXI4P7fDl 1; expires 1m; } if ($static_fileXI4P7fDl = 0) { add_header Cache-Control no-cache; } } #PROXY-END/ ``` 如果使用了类似宝塔面板、1Panel面板之类的,操作会更为简便,创建一个网站,域名`*.bac.com`,这样所有`bac.com`的二级域名都会指向此站点。然后设置反向代理,目标URL填写`http://0.0.0.0:37257`。 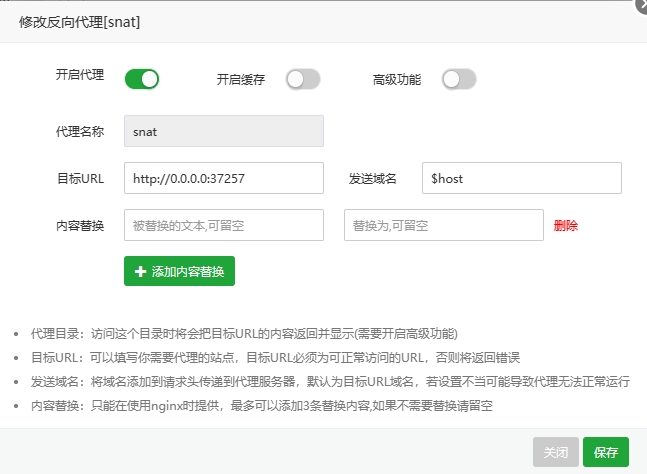 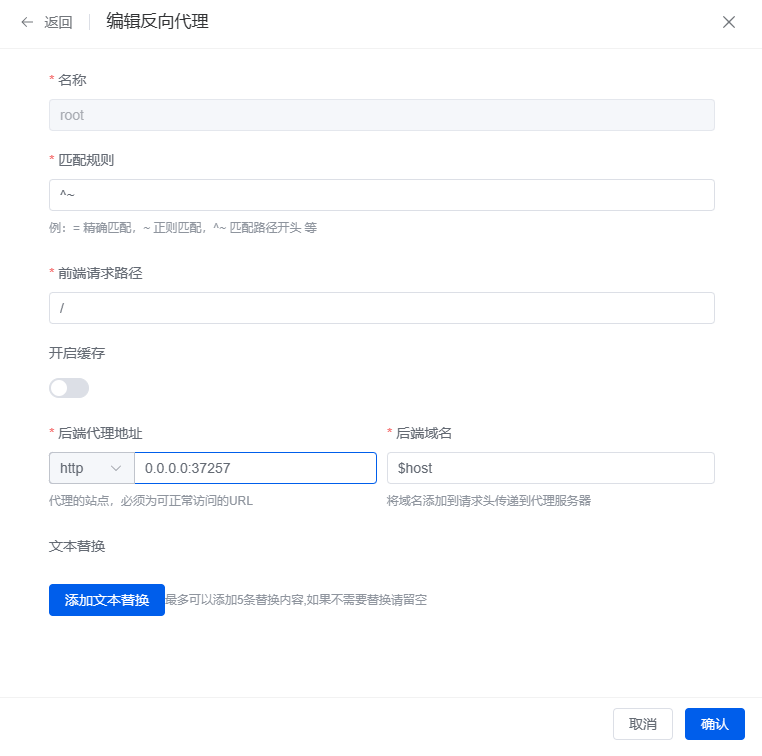 Loading...  基于toml配置文件格式部署frps内网穿透,之前写过一篇[NAS之搭建frp内网穿透服务过程记录](https://www.seesharper.cn/archives/nat.html),当时版本基于`0.4x`,新版本弃用了`.ini`配置文件,改为`TOML`、`YAML `和 `JSON`,`TOML`格式比较精简,同是也是新版本的默认配置文件格式。所以使用`TOML`格式重新部署了之前的项目。在这里记录一下部署过程。 ## 快速启动 1. 通过[releases](https://github.com/fatedier/frp/releases)页面下载适合自己系统的包,以`linux_amd64`平台为例: ```shell wget https://github.com/fatedier/frp/releases/download/v0.52.3/frp_0.52.3_linux_amd64.tar.gz ``` 2. 解压压缩包 ```shell tar zxvf frp_0.52.3_linux_amd64.tar.gz ``` 3. 解压压缩包 ```shell cd zxvf frp_0.52.3_linux_amd64.tar.gz #启动frpc ./frpc -c ./frpc.toml #启动frps ./frps -c ./frps.toml ``` 4. (可选)使用`pm2`守护进程 ```shell cd zxvf frp_0.52.3_linux_amd64.tar.gz #启动frpc pm2 start "./frpc -c ./frpc.toml" -n frpc #启动frps pm2 start "./frps -c ./frps.toml" -n frps #保存任务列表 pm2 save ``` ## 配置文件 配置文件内容上大体和原来差不多,只是写法略有不同,同时命名规则也略有不同,各配置属性名采用了[小驼峰命名法](https://www.baidu.com/s?wd=%E5%B0%8F%E9%A9%BC%E5%B3%B0%E5%91%BD%E5%90%8D%E6%B3%95)。 ### frpc.toml ```toml # 远程服务器地址,支持域名和ip serverAddr = "100.100.100.100" # 远程服务器监听端口,可以配合nginx反向代理实现去端口 serverPort = 37257 # 启用quic协议 transport.protocol = "quic" # 认证token,frpc/frps通信认证 auth.token = "abcdefg" # 启用端口复用 transport.tls.disableCustomTLSFirstByte = false # 客户端面板 webServer.addr = "127.0.0.1" webServer.port = 47400 webServer.user = "adminsweb" webServer.password = "adminsweb" # 日志输出文件路径 log.to = "frpc.log" # 日志文件最多保留天数 log.maxDays = 7 # 相对完整的代理示例,一般情况下http代理只需要填写到 customDomains 即可 # [[proxies]] # name = "web" # type = "http" # localPort = 80 # customDomains = ["www.yourdomain.com"] # # 代理负载均衡,相同groupKey的代理,会视为负载均衡 # # 对于 tcp 类型代理,需要确保 groupKey 相同以进行权限验证,同时 remotePort 也需一致。 # # 对于 http 类型代理,需要保证 groupKey, customDomains(自定义域名),subdomain 和 locations 相同。 # loadBalancer.group = "web" # loadBalancer.groupKey = "123" # # 启用健康检查,类型为 http # healthCheck.type = "http" # # 健康检查发送 http 请求的 path,后端服务需要返回 2xx 的 http 状态码 # healthCheck.path = "/status" # # 建立连接超时时间为 3 秒 # healthCheck.timeoutSeconds = 3 # # 连续 3 次检查失败,此 proxy 会被摘除 # healthCheck.maxFailed = 3 # # 每隔 10 秒进行一次健康检查 # healthCheck.intervalSeconds = 10 # # 获取用户真实IP,具体配置见 https://gofrp.org/zh-cn/docs/features/common/realip/ # transport.proxyProtocolVersion = "v2" # # 带宽限速,支持MB,KB # transport.bandwidthLimit = "1MB" [[proxies]] name = "wiznote" type = "http" localPort = 29981 customDomains = ["wiz.bac.com"] [[proxies]] name = "mysql8" type = "tcp" localPort = 23306 remotePort = 23636 customDomains = ["mysql8.bac.com"] ``` ### frps.toml ```toml # 远程服务器监听端口,可以配合nginx反向代理实现去端口 bindPort = 37257 vhostHTTPPort = 37257 vhostHTTPSPort = 37257 # QUIC 绑定的是 UDP 端口,可以和 bindPort 一样 quicBindPort = 37257 # 认证token,frpc/frps通信认证 auth.token = "abcdefg" # 启用端口复用 transport.tls.disableCustomTLSFirstByte = false # 日志输出文件路径 log.to = "console" # 日志文件最多保留天数 log.maxDays = 7 # 服务端面板 webServer.addr = "0.0.0.0" webServer.port = 47030 webServer.user = "Your User" webServer.password = "Your Password" #webServer.tls.certFile = "Your server.crt" #webServer.tls.keyFile = "Your server.key" ``` 简单应用场景下,以上配置文件已经足够,比如微信支付调试之类的场景,可以在`frpc.tmol`部署一个如下的代理: ```toml [[proxies]] name = "wechatdebug" type = "http" localPort = 23306 customDomains = ["wechatdebug.bac.com"] ``` 此时便可以通过 `http://wechatdebug.bac.com:37257`访问内网的项目,其中`37257` 是`frps.toml`中的`bindPort`,也就是监听端口。 ### 注意: 如果通过上述`frps`配置文件进行配置,首先要确保云服务器和服务器自身的防火墙都开放了对应端口,以上述配置文件为例,需要开放`37257`的`TCP`协议和`UDP`协议端口。以及用于面板访问的`47030`的`TCP`协议端口(不开只是无法访问面板,不影响`frpc`连接)。否则在`frpc`端无法正常连接。同时所使用的自定义域名也要解析到`frps`所在的公网服务器。可以考虑解析`*`记录到服务器,代表所有二级域名。 ## 通过Nginx反代去除端口号 默认情况下,部署完成后,通过自定义域名访问,后面需要带上frps的端口号,这样既不方便,也不美观。可以通过Nginx反向代理来处理。配置如下: ``` #PROXY-START/ location / { proxy_pass http://0.0.0.0:37257; proxy_set_header Host $host; proxy_set_header X-Real-IP $remote_addr; proxy_set_header X-Forwarded-For $proxy_add_x_forwarded_for; proxy_set_header REMOTE-HOST $remote_addr; proxy_set_header Upgrade $http_upgrade; proxy_set_header Connection $connection_upgrade; proxy_set_header x-wiz-real-ip $remote_addr; proxy_set_header X-Forwarded-Proto $scheme; add_header X-Cache $upstream_cache_status; # Set Nginx Cache set $static_fileXI4P7fDl 0; if ($uri ~* "\.(gif|png|jpg|css|js|woff|woff2)$") { set $static_fileXI4P7fDl 1; expires 1m; } if ($static_fileXI4P7fDl = 0) { add_header Cache-Control no-cache; } } location /https { proxy_pass https://0.0.0.0:37257; proxy_set_header Host $host; proxy_set_header X-Real-IP $remote_addr; proxy_set_header X-Forwarded-For $proxy_add_x_forwarded_for; proxy_set_header REMOTE-HOST $remote_addr; proxy_set_header Upgrade $http_upgrade; proxy_set_header Connection $connection_upgrade; proxy_set_header x-wiz-real-ip $remote_addr; proxy_set_header X-Forwarded-Proto $scheme; add_header X-Cache $upstream_cache_status; # Set Nginx Cache set $static_fileXI4P7fDl 0; if ($uri ~* "\.(gif|png|jpg|css|js|woff|woff2)$") { set $static_fileXI4P7fDl 1; expires 1m; } if ($static_fileXI4P7fDl = 0) { add_header Cache-Control no-cache; } } #PROXY-END/ ``` 如果使用了类似宝塔面板、1Panel面板之类的,操作会更为简便,创建一个网站,域名`*.bac.com`,这样所有`bac.com`的二级域名都会指向此站点。然后设置反向代理,目标URL填写`http://0.0.0.0:37257`。   最后修改:2023 年 11 月 20 日 © 允许规范转载 打赏 赞赏作者 支付宝微信 赞 2 如果觉得我的文章对你有用,请随意赞赏
